Ubuntu Stuck at Initramfs After an Update? Here’s What Fixed It
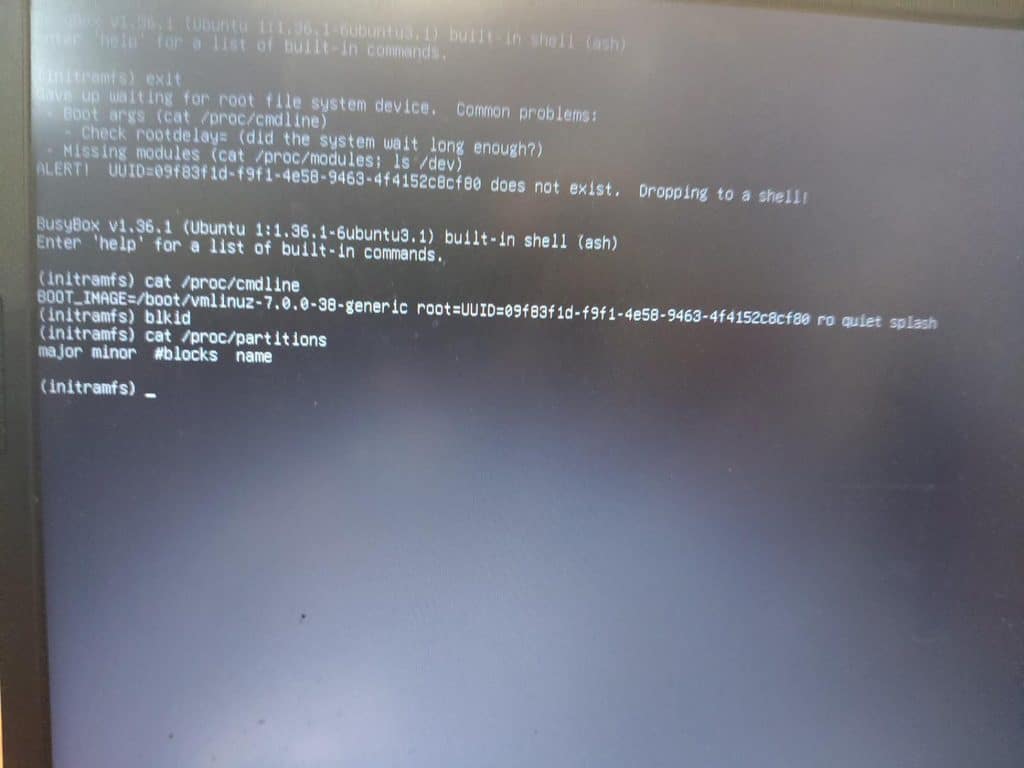
My Ubuntu laptop stopped booting after an update. Instead of the login screen I got a BusyBox shell and this:
Gave up waiting for root file system device.
ALERT! UUID=... does not exist. Dropping to a shell!
(initramfs)
I tried the older kernel from the GRUB menu and landed on the same prompt. What changed my approach was a live USB: it could see the SSD, and the root partition had exactly the UUID Ubuntu said was missing. That pointed at the installed system’s early boot environment rather than the disk, although it didn’t prove the SSD was healthy.
What fixed it: I repaired the broken package dependencies, reinstalled the matching kernel and modules, and rebuilt the initramfs. Ubuntu booted again and I didn’t have to reinstall Ubuntu. Everything below is the route I took, including the mistakes. The partition names and kernel version are from my laptop, so check yours before you copy a command.
Check which initramfs tool you have
The rebuild commands in this guide are for initramfs-tools, which Ubuntu 22.04 and 24.04 use by default. Newer Ubuntu releases changed this: fresh Ubuntu 25.10 Desktop installs moved to dracut, and the 26.04 LTS release notes say dracut is now the default, with initramfs-tools still supported. Ubuntu Server and Raspberry Pi desktop images kept initramfs-tools in 25.10, so the release number alone doesn’t tell you.
My laptop reports Ubuntu 26.04.1 LTS, and the photos below show update-initramfs building the image, so it was using initramfs-tools. Once you are inside the installed system (or inside its chroot, in Step 5) you can check yours:
dpkg-query -W -f='${binary:Package}: ${Status}\n' initramfs-tools dracut dracut-coreLook for install ok installed. A “no packages found” message just means that package isn’t there. If you are on dracut, use its own recovery steps and don’t install initramfs-tools to make my commands work. Dracut still builds an initramfs; only the tool that builds it is different.
Why Ubuntu drops into the initramfs shell
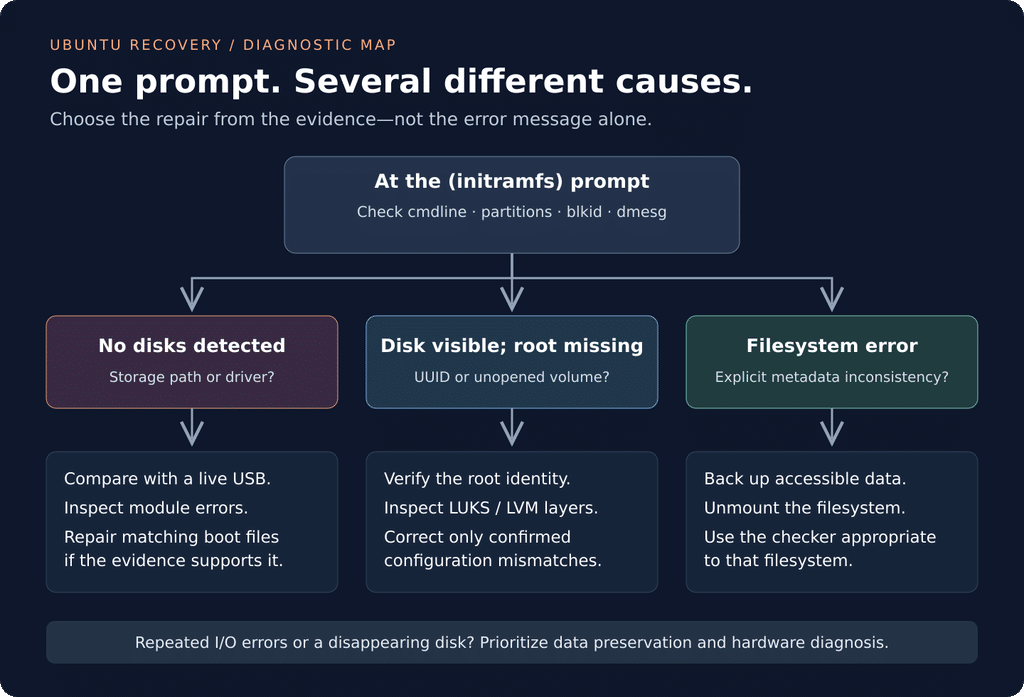
The initramfs is a small boot environment that loads the drivers the kernel needs to find and mount your real root filesystem. If that handover fails, you can end up in a BusyBox shell, as I did. By the time you see (initramfs) the kernel is already running, so the prompt on its own doesn’t tell you whether the SSD or its filesystem is damaged.
A missing-UUID message only says the root filesystem wasn’t found at that point: a storage driver may not have loaded, an encrypted volume may not be open, the boot configuration may be wrong, or the disk may really be gone.
What my evidence pointed to
The installed system is Ubuntu 26.04.1 LTS. I ended up repairing kernel 7.0.0-38-generic, and the older 7.0.0-34-generic had failed as well. This is what I saw before touching anything:
| What I saw | What it told me |
|---|---|
blkid printed nothing in initramfs |
No filesystems were being detected there |
/proc/partitions was only a header |
The kernel hadn’t exposed any disk or partition |
| The older kernel failed too | Picking the previous entry wasn’t a fix |
dmesg showed a module_layout disagreement |
A module didn’t match the running kernel |
| The live USB saw the NVMe SSD | The disk itself was readable |
| The root UUID matched what the boot asked for | There was no reason to edit the UUID |
| APT reported many unmet dependencies | Packages needed repairing before the kernel could be reinstalled |
The kernel log had one more clue:
vmd: disagrees about version of symbol module_layout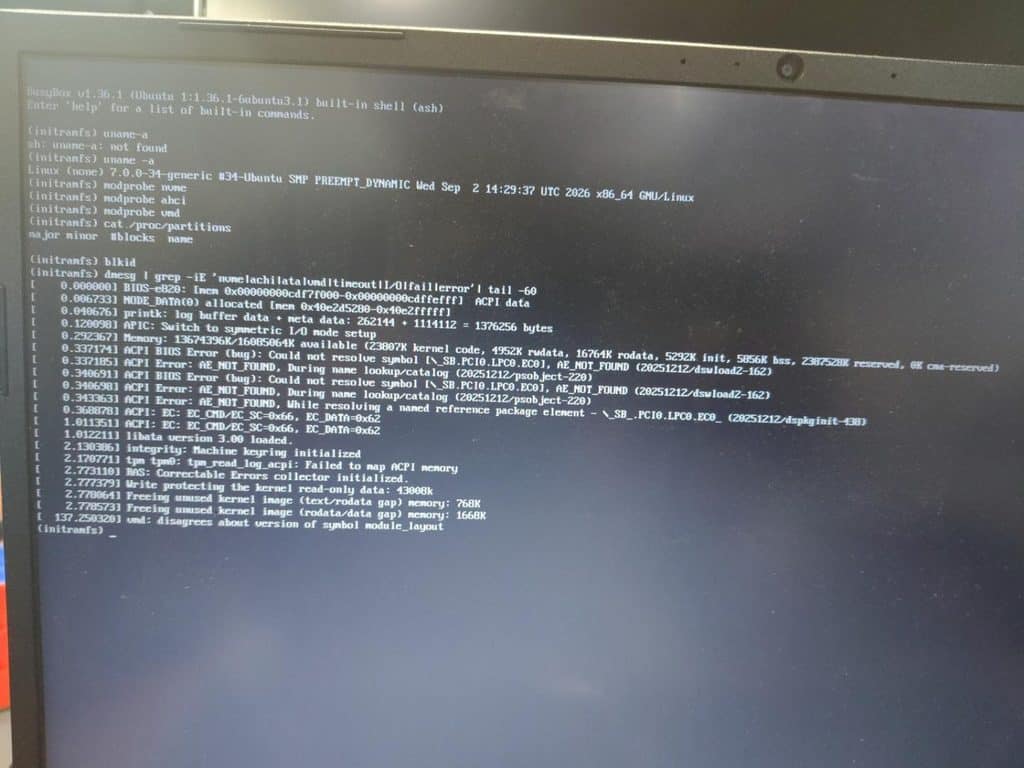
Linux refuses to load a module when its symbol versions don’t match the kernel (see the kernel documentation on module versioning). That gave me a reason to check the kernel and its modules together. I can’t say from that line alone that my SSD depends on VMD; I’d have to identify the storage controller to know.
My working theory is that an update was interrupted and left broken dependencies and boot files that no longer matched. The repair fits that theory, but I never worked out exactly what went wrong during the update, so treat the cause as unproven.
Before you start
Plug the laptop in and have a bootable Ubuntu USB and an internet connection ready. If the live session can read your files, copy anything important to an external drive first, because a copy on the same SSD won’t survive an SSD failure. Identify partitions by filesystem, UUID, size and mount point rather than assuming they match my examples, and run the commands in order. Don’t format anything or run automatic filesystem repair.
This walkthrough is for ext4, initramfs-tools and GRUB with an ordinary root partition and a separate EFI partition. If you use encryption, LVM, RAID, Btrfs or ZFS, work out that layout first; the other-causes section covers what changes.
Keep track of which terminal you’re typing in. I moved between three:
| Where you are | Prompt | Note |
|---|---|---|
| Early boot shell | (initramfs) |
Limited tools, no sudo |
| Live Ubuntu desktop | ubuntu@ubuntu:~$ |
Use sudo |
| Installed system via chroot | root@ubuntu:/# |
Already root, so leave sudo out |
The prompt isn’t part of the command.
Step 1: collect evidence at the initramfs prompt
Run these one at a time:
uname -r
cat /proc/cmdline
cat /proc/partitions
blkid
uname -r shows the kernel that actually booted. /proc/cmdline shows the root device it wanted, usually as root=UUID=.... Compare that with any UUIDs blkid finds. Then pull the relevant kernel messages:
dmesg | grep -iE 'nvme|ahci|ata|vmd|timeout|I/O|fail|error' | tail -60BusyBox builds differ. If an option isn’t supported, run plain dmesg and photograph the lines that matter. If you know which driver your storage controller uses, you can try loading it:
modprobe nvme
modprobe ahci
modprobe vmd
This is a diagnostic attempt, not a general fix. A silent modprobe doesn’t prove the disk appeared, so check /proc/partitions, blkid and dmesg again, and never force a module that doesn’t match. If a driver does load and your root UUID shows up, typing exit may let the boot continue. If you land back at the prompt, keep going.
Step 2: try an older kernel
Reboot into the GRUB menu, open Advanced options for Ubuntu and pick an earlier kernel. On some machines you need to tap Esc or hold Shift during startup to see the menu. If the older kernel boots, back up your files and repair the packages from the installed system. Use sudo for the commands that need root, and skip the live-USB, chroot, DNS and unmount steps.
Both kernels failed on my laptop, so I moved to a live USB.
Step 3: boot a live USB and find the installation
Choose Try Ubuntu, not Install, open a terminal and run:
lsblk -o NAME,SIZE,FSTYPE,UUID,MOUNTPOINTS
sudo blkid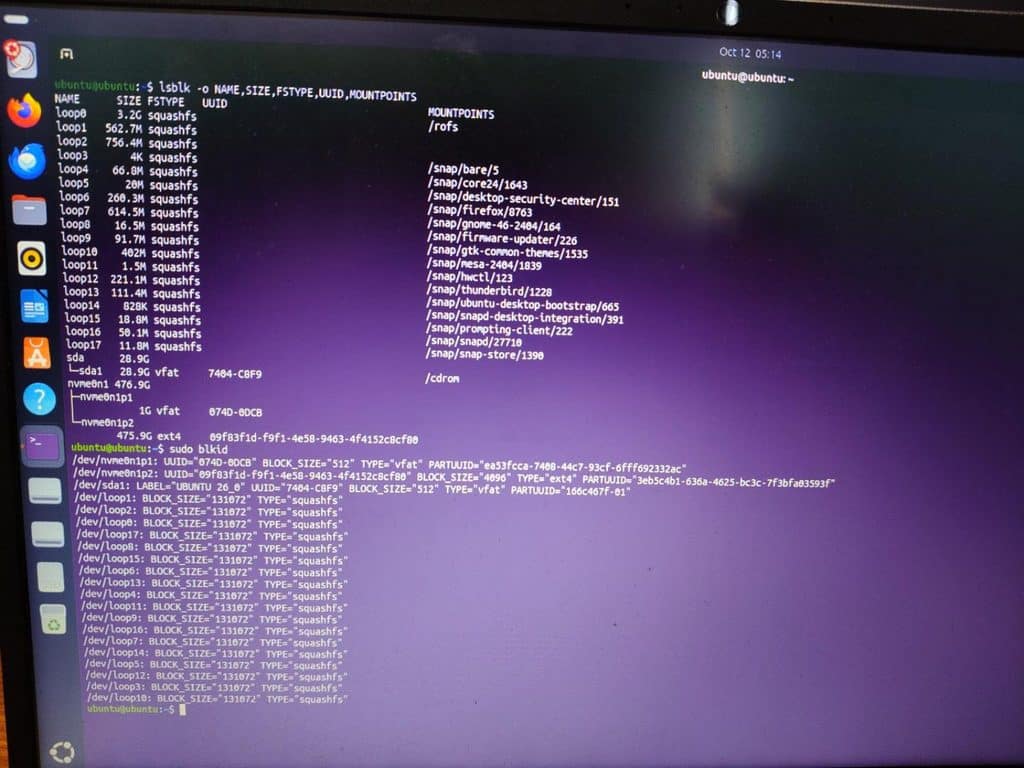
On my laptop:
| Device | Size and type | What it is |
|---|---|---|
/dev/nvme0n1p1 |
about 1 GB, FAT | EFI System Partition |
/dev/nvme0n1p2 |
about 475.9 GB, ext4 | Installed Ubuntu root |
/dev/sda1 |
about 28.9 GB, FAT | The live USB |
Yours will differ: SATA names, a different NVMe number, or /dev/mapper/... volumes. If the disk is missing from the live session too, stop the package-repair route and look at firmware detection and storage errors (see the other-causes section).
Step 4: look at the root partition without replaying the journal
I used /dev/nvme0n1p2 because I’d confirmed it was the root partition. Swap in your own device name. First create the mount point and check whether the file manager already mounted the partition:
sudo mkdir -p /mnt/ubuntu
findmnt -S /dev/nvme0n1p2
If findmnt prints a line, close the file-manager windows on that drive and unmount it with sudo umount /dev/nvme0n1p2. If it prints nothing, skip that. Then mount it read-only:
sudo mount -o ro,noload /dev/nvme0n1p2 /mnt/ubuntuOn ext4, noload skips journal replay (see ext4(5)). It’s for looking around, not repairing, and an unclean filesystem can show inconsistent data without recovery. Don’t use it on other filesystems. Then:
cat /mnt/ubuntu/etc/os-release
cat /mnt/ubuntu/etc/fstab
ls -lh /mnt/ubuntu/boot
ls /mnt/ubuntu/lib/modules
df -h /mnt/ubuntu
I checked the UUID, the kernel files in /boot, the module folders and the free space. Root had about 299 GB available. Read fstab for a separate /boot partition. If there is one, mount it read-only at /mnt/ubuntu/boot (for ext4, -o ro,noload again) before you look at boot files, because the empty folder underneath an unmounted /boot is misleading. If the file manager mounted root before you did, it may already have replayed the journal.
Step 5: mount the system for repair and enter the chroot
After inspecting and backing up, remount root with write access. If you mounted a separate /boot a moment ago, unmount it first:
cd ~
sudo umount /mnt/ubuntu
sudo mount /dev/nvme0n1p2 /mnt/ubuntu
If you have a separate /boot, mount it now (put your real device in place of the placeholder), and on a UEFI system mount the EFI partition:
sudo mount /dev/YOUR_BOOT_PARTITION /mnt/ubuntu/boot
sudo mkdir -p /mnt/ubuntu/boot/efi
sudo mount /dev/nvme0n1p1 /mnt/ubuntu/boot/efi
Skip the first line if you have no separate /boot, and skip the EFI lines on a legacy BIOS install. Never mount the ext4 root a second time at /boot/efi. Next, give the chroot access to the live session’s devices and system folders and step inside:
sudo mount --bind /dev /mnt/ubuntu/dev
sudo mount --bind /dev/pts /mnt/ubuntu/dev/pts
sudo mount --bind /proc /mnt/ubuntu/proc
sudo mount --bind /sys /mnt/ubuntu/sys
sudo mount --bind /run /mnt/ubuntu/run
sudo chroot /mnt/ubuntu /bin/bash
A chroot makes commands use the installed system’s files, but it doesn’t boot that system’s kernel. uname -r will still show the live USB’s kernel, so pick the repair kernel from the installed /boot and /lib/modules, not from uname. There’s a good overview in the ArchWiki chroot page.
Step 6: fix DNS only if downloads fail
Inside the chroot, try:
apt-get updateI got “Temporary failure resolving” for the repository hosts. If you do too, leave the chroot with exit and check the live session itself with getent hosts archive.ubuntu.com. If that fails, fix the live session’s Wi-Fi or Ethernet first. If it works but the chroot can’t resolve, borrow the live session’s resolver temporarily. First look at what’s there:
ls -l /mnt/ubuntu/etc/resolv.conf*If a resolv.conf.before-boot-repair file already exists, don’t run the mv below. Keep it and inspect it instead. Otherwise:
sudo mv /mnt/ubuntu/etc/resolv.conf /mnt/ubuntu/etc/resolv.conf.before-boot-repair
sudo cp -L /etc/resolv.conf /mnt/ubuntu/etc/resolv.conf
sudo chroot /mnt/ubuntu /bin/bash
apt-get update
If either file command fails, stop and read the error. You restore the original in Step 9, and you can skip all of this when DNS already works inside the chroot.
Step 7: repair broken dependencies first
My first attempt to reinstall the kernel failed because APT found unmet dependencies. Several desktop libraries were still on older versions and libicu78 was missing. Look at the package state:
dpkg --audit
apt-mark showhold
apt-get check
If APT says dpkg was interrupted, run dpkg --configure -a and read any errors. Then do a dry run of the repair and review everything it proposes, especially removals and downgrades:
apt-get -s --fix-broken install > /tmp/repair-preview.txt 2>&1
cat /tmp/repair-preview.txt
grep -E 'upgraded,|^Remv |^E:' /tmp/repair-preview.txt
My preview ended with 38 upgraded, 25 newly installed, 0 to remove and 55 not upgraded.
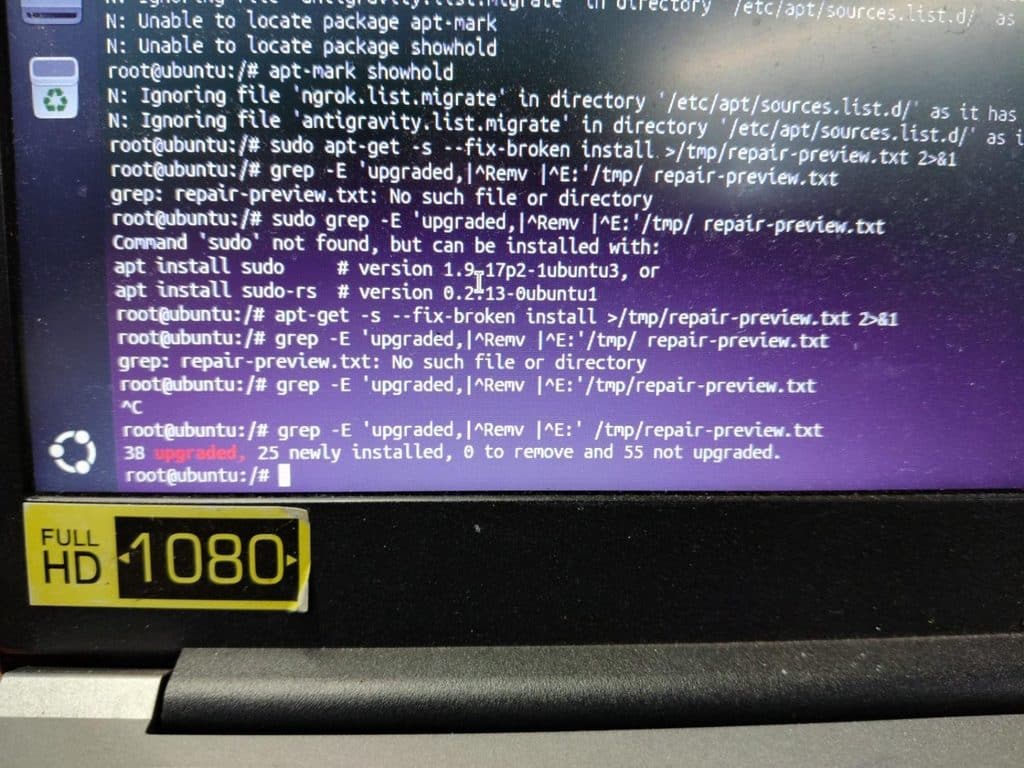
Once the preview looked sane, I ran the real repair with a guard against removing packages:
apt-get --fix-broken --no-remove install-s only simulates, --fix-broken repairs dependencies, and --no-remove stops APT if it wants to remove something. It doesn’t stop every risky upgrade, so the review still matters (see apt-get(8)). If APT wants to remove your desktop, boot packages or lots of unrelated apps, don’t force it. Check package origins, held packages and your sources instead, and don’t change release names just to silence an error.
APT also asked about a modified /etc/apparmor.d/obsidian file, and I answered N to keep my profile. For a question like that, read the file name and the options, and press D to see the differences if it’s offered. When it finishes, run apt-get check again and continue only when the dependency errors are gone. The “55 not upgraded” didn’t mean the repair failed; I dealt with those updates after the laptop booted.
Step 8: reinstall one matching kernel and its modules
This step assumes initramfs-tools. With the dependencies fixed, I reinstalled 7.0.0-38-generic, which was installed on the laptop and available from its repositories. Choose the version that matches your own system. First I copied the existing boot files, as a reference rather than a real backup. Copy only the files that exist; if the initrd is missing, skip it and create it with update-initramfs -c -k 7.0.0-38-generic after the reinstall, if the package hooks haven’t already built it:
mkdir -p /root/boot-repair-backup
cp -a /boot/vmlinuz-7.0.0-38-generic /boot/initrd.img-7.0.0-38-generic /root/boot-repair-backup/
Then I reinstalled the kernel image and its modules:
apt-get install --reinstall linux-image-7.0.0-38-generic linux-modules-7.0.0-38-generic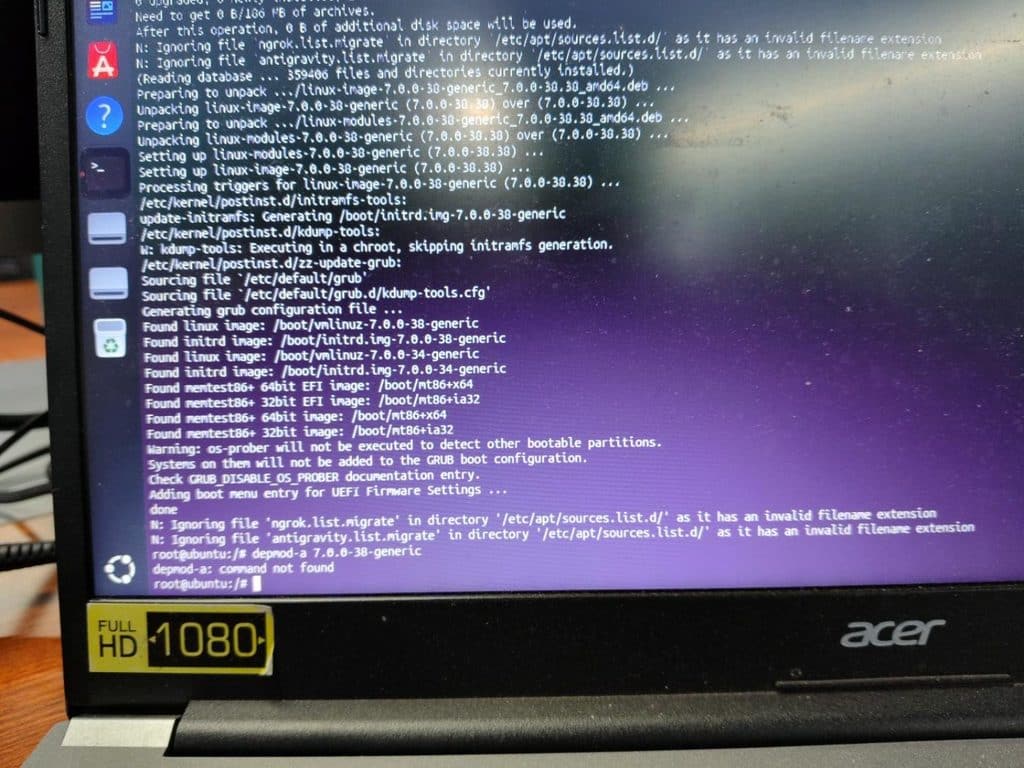
depmod -a, not a failed install.Package layouts vary. If your driver lives in a matching linux-modules-extra-... package, that has to be installed too. Don’t mix packages from different kernel versions, and if the exact old version is gone, pick a supported matching kernel and module set from your configured release instead of downloading random .deb files. After the reinstall I ran these one at a time:
depmod -a 7.0.0-38-generic
update-initramfs -u -k 7.0.0-38-generic
update-grub
depmod rebuilds the module dependency list; it can’t make an incompatible module compatible (depmod(8)). update-initramfs -u rebuilds an existing image, and you’d only use -c to create one that’s missing (update-initramfs(8)). update-grub refreshes the boot menu. The reinstall may already have run these hooks, but running them yourself shows any error before you reboot. If image generation fails, fix that first.
Step 9: undo the temporary changes and reboot
If you replaced resolv.conf in Step 6, put the original back inside the chroot (skip this if you didn’t touch it):
mv -f /etc/resolv.conf.before-boot-repair /etc/resolv.confThen leave the chroot either way:
exitBack in the live session, close any file-manager windows on the installed drive and unmount in reverse order, one line at a time:
cd ~
sync
sudo umount /mnt/ubuntu/run
sudo umount /mnt/ubuntu/sys
sudo umount /mnt/ubuntu/proc
sudo umount /mnt/ubuntu/dev/pts
sudo umount /mnt/ubuntu/dev
sudo umount /mnt/ubuntu/boot/efi
sudo umount /mnt/ubuntu
sudo reboot
Skip the EFI line if you never mounted it, and if you mounted a separate /boot, unmount /mnt/ubuntu/boot before the last umount. If something says “target is busy”, don’t force it: leave other chroot shells, move terminals out of that folder and check what’s still using it. Remove the USB when prompted and boot the normal Ubuntu entry.
Step 10: check the system after it boots
uname -r
sudo apt-get check
sudo dpkg --audit
findmnt /
systemctl --failed
Confirm the kernel you expect is running, root is on the right device and the package checks are clean. Look at any failed services one by one; an unrelated failed service doesn’t mean the boot repair didn’t work. My laptop booted and showed 7.0.0-38-generic, which told me the repair worked. The dependency check had passed inside the chroot, but I don’t have a recorded result for the final check after the reboot.
If it isn’t your problem: other causes
My fix suited my machine. Before you copy it, match your symptoms against this table.
| What you see | Likely area | Next step |
|---|---|---|
Root UUID missing and no disks in /proc/partitions |
Storage detection or driver | Compare with a live USB and read the kernel log |
| Disk visible, root UUID absent | Wrong root reference, unopened encrypted or LVM layer, changed filesystem | Compare /proc/cmdline, blkid, fstab and the storage layout |
| “run fsck manually” or an explicit ext4 error | Filesystem metadata | Back up, unmount, then run the right checker |
module_layout or “invalid module format” |
Kernel and modules don’t match | Restore a matching kernel and modules, rebuild the initramfs |
| Encrypted partition visible, root missing | LUKS not unlocked | Unlock the container and inspect what’s inside |
| LVM volume visible, root LV missing | Volume not activated | Check and activate the right volume group |
| “No space left on device” while building the image | Full /boot or root, or no free inodes |
Check space before removing packages |
grub rescue> |
An earlier boot stage | Use GRUB recovery (see the GRUB manual) |
| A signature or “key rejected” error for a third-party module | Secure Boot | Sign and enrol the module; see Ubuntu’s Secure Boot documentation. Switching it off won’t fix a symbol mismatch |
| Disks vanished after a firmware reset or storage-mode change | BIOS RAID/RST vs AHCI | Note the original setting first, and don’t switch it blindly on a Windows dual-boot (Ubuntu’s AHCI guide) |
| Disk missing in the live USB and the firmware | Hardware, cable or firmware | Hardware diagnosis and data recovery first |
Filesystem errors: when to use fsck
If the message is an explicit filesystem error rather than a missing driver, use a live USB and make sure the filesystem isn’t mounted anywhere:
findmnt -S /dev/YOUR_EXT4_ROOT
sudo umount /dev/YOUR_EXT4_ROOT
sudo e2fsck -f /dev/YOUR_EXT4_ROOT
Replace the placeholder, run umount only if the device is mounted, and read each prompt instead of adding -y. Never point e2fsck at a whole disk, the EFI partition, an encrypted container or an LVM physical volume, and never at a mounted filesystem (e2fsck(8)). If you see repeated I/O errors or the disk keeps disappearing, rescue your data before attempting more writes. Btrfs, XFS and ZFS have their own recovery tools.
“UUID does not exist” but the disk is visible
Compare the failed boot’s /proc/cmdline with sudo blkid from the live USB and with the installed fstab. An encrypted container and the filesystem inside it have different UUIDs, so make sure you compare the right layer. If the root UUID really did change, correct the references that use it (/etc/fstab and any explicit GRUB settings, and /etc/crypttab only if the encrypted container’s UUID changed), then rebuild the initramfs and GRUB config from a properly mounted system. Don’t make a new filesystem UUID just to match an old message. Mine already matched, so I left it alone.
The root filesystem is inside LUKS or LVM
If lsblk -f shows crypto_LUKS, the outer partition isn’t directly mountable. Open it read-only to look inside (cryptsetup-open(8)), and check what the mapping holds before assuming it’s root:
sudo cryptsetup open --readonly /dev/YOUR_LUKS_PARTITION cryptroot
lsblk -f
For a repair, close it and reopen it without --readonly. With LVM, look first, then activate only the group you need and mount the logical volume that holds the filesystem, not the physical volume (vgchange(8)):
sudo pvs
sudo vgs
sudo lvs
sudo vgchange -ay YOUR_VOLUME_GROUP
Close what you opened after unmounting. Hardware-backed encryption may need its own recovery key and procedure.
/boot is full, or the initramfs image is missing
After mounting the right partitions, check space and inodes:
df -h /mnt/ubuntu /mnt/ubuntu/boot
df -i /mnt/ubuntu /mnt/ubuntu/boot
A separate /boot can be full while root has plenty of room. Remove old kernels through the package manager, keep a known-working one, and never delete /boot or /lib/modules with wildcards. Rebuild the image afterwards and read the whole output.
Mistakes I made along the way
A few of my errors were just typos or the wrong shell. They looked like new problems at the time, and they’re easy to repeat when you’re copying from a second screen.
| Message or mistake | What it was |
|---|---|
| “mount point does not exist” | Create it first: sudo mkdir -p /mnt/ubuntu |
| “special device … does not exist” | I’d typed nvem instead of nvme. Check lsblk |
| “Device already mounted” | Run findmnt, close what’s using it and unmount the old location first |
sudo: command not found in the chroot |
The chroot shell is already root, so drop sudo |
depmod-a: command not found |
Missing space: depmod -a |
grep can’t find the preview file |
The path is /tmp/repair-preview.txt, with no space inside it |
grep seems to hang |
It was waiting on standard input because I left out the file name. Press Ctrl+C and fix the command |
| “Unable to locate package apt-mark” | apt-mark showhold is its own command, not an argument to apt-cache policy |
| “Ignoring … .list.migrate” | APT only reads .list and .sources files, so it skips these (sources.list(5)). They weren’t the dependency problem |
| os-prober warning | Other operating systems may not be added to the menu automatically. It didn’t stop this Ubuntu entry being created |
| “kdump-tools: Executing in a chroot, skipping initramfs generation” | That only refers to its crash-dump image. Look at the normal update-initramfs output for the real result |
After Ubuntu boots again
Back up your important files, work through the remaining updates, and keep a kernel you know boots until the next one has proven itself. Let package installs and initramfs generation finish before you restart, and watch free space in /boot as well as root. To investigate the original failure, keep /var/log/apt/history.log, /var/log/apt/term.log, /var/log/dpkg.log and any release-upgrade logs. Getting the system back doesn’t prove what went wrong.
Common questions
Does “UUID does not exist” mean my files are gone?
No. In my case the same filesystem and UUID were readable from a live USB. It means the installed boot couldn’t see the device, and you still need to find out why.
Can update-initramfs alone fix this?
Sometimes, on an initramfs-tools system, when the installed kernel and drivers are already correct and only the boot image is stale. In my case I repaired the dependencies, reinstalled the kernel and module packages and rebuilt the image, and I didn’t isolate which of those changes was essential. Rebuilding can’t fix modules that don’t match the kernel. On dracut systems it’s a different tool.
Keep reading
- Linux Package Management with apt and dnf — Like an Admin — How apt and dnf behave, and how to read their errors.
- Linux Disk Full: df, du, lsof, and Inodes — Check space and inodes when a disk or /boot looks full.
- systemd: Unit Failed to Start — How to Read journalctl and Fix It — The next stage of boot: when a service will not start.
Sources
The photos and the repair story are from my own laptop. The sections on other causes come from the documentation below, and I haven’t tested every branch on this machine. Checked on 12 October 2026; read the manual for your own release if options or package names differ.
- update-initramfs(8): what the initramfs is and how to create or update one
- Linux kernel documentation: module versioning
- ArchWiki: chroot
- ext4(5): journal and mount options
- apt-get(8): simulation, dependency repair and the removal guard
- depmod(8)
- e2fsck(8)
- cryptsetup-open(8)
- vgchange(8)
- Ubuntu Desktop: reconfigure Windows to use AHCI
- GNU GRUB manual: GRUB only offers a rescue shell
- sources.list(5)
- Ubuntu 25.10 release notes: dracut on Desktop, with the Server and Raspberry Pi exceptions
- Ubuntu 26.04 LTS summary: dracut
- Dracut news for Ubuntu 26.04 LTS and 26.10
Figures 2 to 6 are unedited photographs from the repair, so some show commands I mistyped before correcting them. Follow the command blocks in the text. Figure 1 is a diagram, not a photograph.
Related: Upgrading a production server rather than a desktop? See how to safely upgrade an Ubuntu VPS that runs Docker.